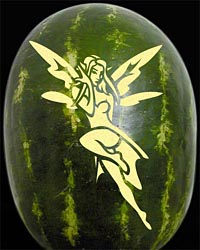
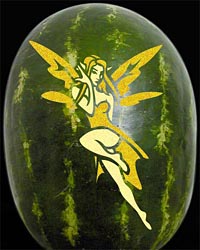
What Is sculpting?
You've probably noticed that my patterns fall in two categories.
- First is the straight "black and white" pattern. These are the ones that are usually easiest to carve where all the features of the design can be carved strait thru.
- The second category are the two tone patterns that require some sculpting, i.e. where the skin is removed, but not cut all the way thru. For the sake of consistency with terms, I will call these "sculpted" patterns (also called "shaded") and the technique I will call "sculpting". Depending on the tool used and the tequniqe, the method of sculpting can include shaving, skinning, raking, trimming, scraping, peeling, etc.
When creating patterns, my goal is to keep them as simple as possible and to make them the strait cut thru black and white type. However, sometimes, in order to better capture the likeness of a design, I will end up creating sculpted patterns.
With Watermelons, the contrasting green shell with the light flesh beneath the skin of the melon allows you to present it with or without a light and still have a great display.

However, if you choose to light it you can get some great "two tone" shaded effects even with the straight black and white patterns.
Take my new Leprechaun pattern for example:

Here is how he would look
cut all the way thru.

But, by sculpting parts of the pattern, and cutting thru other parts, you can add darker tones to the hat and clover for a more dramatic effect.
Cool Huh?
Here's an example with a real pumpkin:

Notice how I deviated from the pattern:

See also my pumpkin of Hades:

And its pattern:

Here's a watermelon example:

With shading:

The whole point of this tip is to get creative with the patterns. Experiment. Don't be afraid to deviate from the pattern layout to get more dramatic effects.

Wilting Woes
Perplexed? Is your perfect pretty pumpkin appearing poor and penitent?
Preserve and perk up your parched pumpkin with these cool tips.
I'm often asked how to keep my carved masterpiece looking fresh. Here's what's worked for me. I take the wilting gourd and soak it in a tub of water for about an hour or more.

Here are some before and after pictures:


Soaking in water works well as you can see, but also keep in mind you want to keep mold from forming on the pumpkin, and keeping it wet can attract mold forming bacteria. So I put disinfectant and/or chlorine bleach in the water to help kill any germs and bacteria.
Other things to try:
Tom Nardone, of ExtreamePumpkins.com, writes:
"I spray the crap out of the pumpkin with WD-40. It seems like it is similar to Vaseline. Petroleum right? It is clear and I already have a can of it. Best of all, it works.
Actually, I don't even use name brand WD-40, I use the dollar store variety. I especially like the name "Spra Loos". That is a sweet name.
People keep writing me and asking if this really works and/or if it is dangerous. The answer is yes it does really work. You spray the entire pumpkin inside and out and it will prevent rotting for a while. Keep in mind that a pumpkin will usually start to rot in about 3 days of cool (70 degree) weather and less in hot weather so don't carve those pumpkins too early.
Also, some folks seem to think that WD40 will combust violently when they put a tealight candle in the pumpkin. To them I say nope! The oil in WD40 is flammable indeed but it really will only combust when it is vaporized. Once it is on the surface of the pumpkin it won't light. Trust me, I've tried to light a pumpkin on fire in a number of ways. Just don't spray the WD40 on the pumpkin while the candle is burning."
Use this technique at your own risk. 🙂
Pumpkin Fresh
I've never tried it, but Pumpkin Fresh is a commercial product that has proven to work with great success. Check it out here:
Pumpkin Carving All Year Long?
Open up a whole NEW world of possibilities with your pumpkin carving skills. Discover the creative art of watermelon carving. Entertain family and guests in style with a STUNNING watermelon centerpiece at:
- Summer Parties
- Wedding Dinner Events
- Luaus
- Graduation Parties
- Baptisms
- Birthdays
- Family Reunions
- Christmas, Hanukkah, and Kwanza Parties
Temporary Pumpkin Art
One fascinating thing about ephemeral art (art that is short-lived or fleeting) is that it demands attention now, while it lasts. To me it's the carving and creating that is fun and enjoyable. I prefer to keep my life as simple as possible. Accumulating and storing things just adds more complexity. Life is more about the moments and memories than stuff. I like that I can carve and create a masterpiece that is enjoyed and appreciated in the moment, then, after it has filled the measure of it's creation, it can be happily discarded.
It's not just the art of carving that I enjoy, but the art of creating the pattern. Although the carved pumpkin or watermelon is temporary, the patterns I create are quite permanent and can be shared and used over and over. Carving pumpkins patterns are great for Halloween, but when I discovered that the patterns can be used for watermelons I was excited that I could extend my new-found hobby beyond October and delight others throughout the year.
Difference With Watermelons
Watermelons make great centerpiece displays for special occasions or even for adding a touch of class to a family picnic or party. Take the time to scoop out the watermelon with a parisian scoop (also called a melon baller) and serve the watermelon alongside the display. Carving pumpkins patterns into pumpkins is not much different than carving into a watermelon, but I have discovered some pleasant differences. Watermelons have a dark skin with a very light colored rind just under the skin. This contrast can make for a perfect display without having to be lit like a pumpkin would have to be in order to appreciate the artwork. With watermelons it can be more difficult to see the pattern when transferring it by poking holes and you may need to pounce white flour over the design to get them to show up better. In my book, You Too Can Create STUNNING Watermelon Carvings I give 3 different ways you can transfer patterns onto watermelons (or pumpkins) as well as many other tips from how to choose the right melon to what tools work best for carving.


