Carving Tools


“What tools do you use to carve your pumpkins?”
It’s a question I often get asked.
While giving a presentation at a local wood carvers club meeting some time ago, I pulled out my little plastic box full of a variety of gadgets and gizmos. As I began the demonstration, I dumped the contents onto the table in front of me, and fingered thru a few items until I found something I could use to poke out my pattern with. During the presentation I would grab for whatever was closest or most convenient and continue working.
“It doesn’t look like this is much of a science,” someone commented. “I wouldn’t call it disorganized, but you don’t seem to be particular about what tool you use to get the job done”.
Another person even handed me one of their wood carving tools to see if that would work better for the particular area I was working on at the moment. It worked great.
Yep. That’s pretty much how I go about carving a pumpkin or a watermelon.
Of course, for the simplest designs, a simple pumpkin saw may work fine for the whole design, start to finish. On more difficult designs, you will find me reaching for something else to get into the more detailed areas better, or to sculpt out a large area quicker.
Here are some of the most used items in my pumpkin carving toolbox:

Basic Tools

First of all, you can’t go wrong with a good Pumpkin Masters® carving kit. These little tools were specifically made for carving pumpkin patterns and they work great for doing what they were designed for.
 Pattern transfer poker. Pumpkin Master’s new design is improved over their earlier pokers. These allow you to poke out the design and transfer the pattern to the pumpkin quicker.
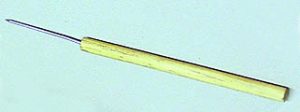
I will use a poker with a smaller tip in tight places on more intricate patterns. The tool shown here I purchased in the pottery section of the local craft store.
Note: I hardly use the poking method for transferring my patterns anymore. I cover other ways to transfer patterns in my book, "You Too Can Create STUNNING Watermelon Carvings"
Scissors and tape. You’ll want to have these available for cutting out your pattern and attaching it to the surface of your pumpkin or melon.
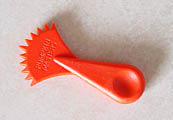
I haven’t found anything better than the Pumpkin Master’s scoop for cleaning a pumpkin. It works great for scraping the inside of the pumpkin or melon to a nice thin wall in preparation for carving.

Child safe pumpkin carving blade. I keep a few of these handy in my kit for when younger children want to join in carving. I give them these to carve with so they don’t break the smaller detail tools. I also use these for cutting the access hole in the top or bottom of the pumpkin or watermelon before cleaning it out.

Saws. Use the smaller saw in more detailed areas. Notice that I have clipped off the end of the blade to a sharp point using a pair of side cutters (sometimes called dikes). This makes it easier to use the blade and poke thru the pumpkin when starting new cuts.

Carving Tools
Wood carving tools (I just use a cheap set). These are what I use to sculpt or shave my design in places where I do not cut all the way thru.


Tile cutting tools (Speedball). These also work great for sculpting. The finer blades allow me to get into tighter areas.


Power Tools


WARNING - don't try this at home!
Actually, don't try this INSIDE the home. The tool I'm going to introduce to you today you may want to use outside because it's going to get messy.
Introducing, the Dremel. There may be other brands that do the same thing, I haven't compared them. The Dremel is what I use.
When (and why) would I use a power tool to carve a pumpkin?
I use a dremel when I want to quickly remove the skin from areas that I do not want to be cut all the way thru (what I call "sculpting").
Normally, if it's just a small area that needs sculpted, I will just use hand tools for the job. I will pull out the Dremel when there are large areas that need to be sculpted.
More importantly, the Dremel is an indispensable tool when carving the foam or fake pumpkins that can be purchased at many craft stores during the Halloween season.
Together with the Dremel itself, here are the various accessories (purchased separately) that I have found make using the Dremel much easier:

Extension. This is an extended flexible shaft that gives you more control in working with detailed areas because you are holding a much smaller tool than the full dremel itself.

Speed chuck. I couldn't live without this one. It makes changing bits fast and easy without having to use a wrench.
Bits. Shown here are the tips I use most. The first two pictures are bits I use when working with real pumpkins and watermelons. The last three pictures are of bits I use when working with foam (fake) pumpkins.


Finally, don't forget the goggles. If you value your eyesight you will want to get a pair of these. (Even if you don't value your eyesight, these come in quite handy for being able to see what your doing amid all the flying debris). I use the cheap kind because I don't mind if I look a little dorky while I'm working.
If you're working with foam pumpkins, you will want to also wear a dust mask. I know a pumpkin carver who actually uses a full blown respirator when carving foam pumpkins. Remember, whatever your hobby is, it's just not as much fun if you get hurt doing it, so always be safe.
Pumpkin Lighting Kit
It's Simple, It's Perfect
Here is a great way to display your carved pumpkin for cheap. This handy pumpkin light trick has worked great for me over the years. Pumpkin lighting at it's best, look no further than your local Wal-Mart or Do-it-Yourself store for a cheap night light & extension cord.


Simply cut a slot into your pumpkin opening (top or bottom), and slide the cord with the light attached into the slot.